")
 Introduction
More than six months have passed since we included GPS-tracks as necessary evidence (confirmation, proof) of the activator's stay in the activated territory.
Almost one and a half hundred logs provided with GPS-tracks were accepted from two dozen operators during this period.
The GPS-tracks were not always perfect, sometimes requiring additional effort and time to verify, and sometimes it was not at all clear even what, where and when it was.
The main complaint from potential activators was: “Why are you make things more complicated?! Make it easier and get more activators!”
I can not agree with these complaints. Although this is just a hobby, in WWFF, as in any other game, there are certain rules and conventions that must be followed if you decide to play this game.
It should be noted that WWFF is one of the most difficult games for activators. It’s not enough to encamp down anywhere on an administrative district territory, or even on the border between two districts of an oblast, it’s not enough to stop somewhere 5-6 km away from the helipad, or to “activate” the great river of Russia, being even 100–700 km far from its riverbank. And it’s not enough to encamp even near to the “activation” object.
One of main WWFF Rules is:
4.4 Working within boundaries of the reference
While activating a WWFF reference area, all equipment (including antenna/s, transceiver/s, power supply/ies, etc) must be within the boundaries of the relevant WWFF reference area.
It is not sufficient for part of the station to be within the boundary of the reference area.
Accordingly, the log manager, in order to upload the activator' log into WWFF Logsearch, must be sure that this rule is completed. The activator should somehow confirm his presence within the territory boundaries during the reference activation.
“Traditional” evidences (proofs), regular to many HAMs, as in some other similar programs, even in RFF before — photographs require a lot of effort of the activator. These are losses of time, what is always insufficient, enough of lighting is required, bad weather often interferes, and the most difficult thing is associating of the photos to the location, which, most often, is very difficult to provide. The boundaries of SPNA (Specially Protected Nature Areas) are often not marked at all on the terrain in many cases, there are no information boards, signs, signposts. And even if they exist, they often mark the boundary of SPNA a little better than nothing.

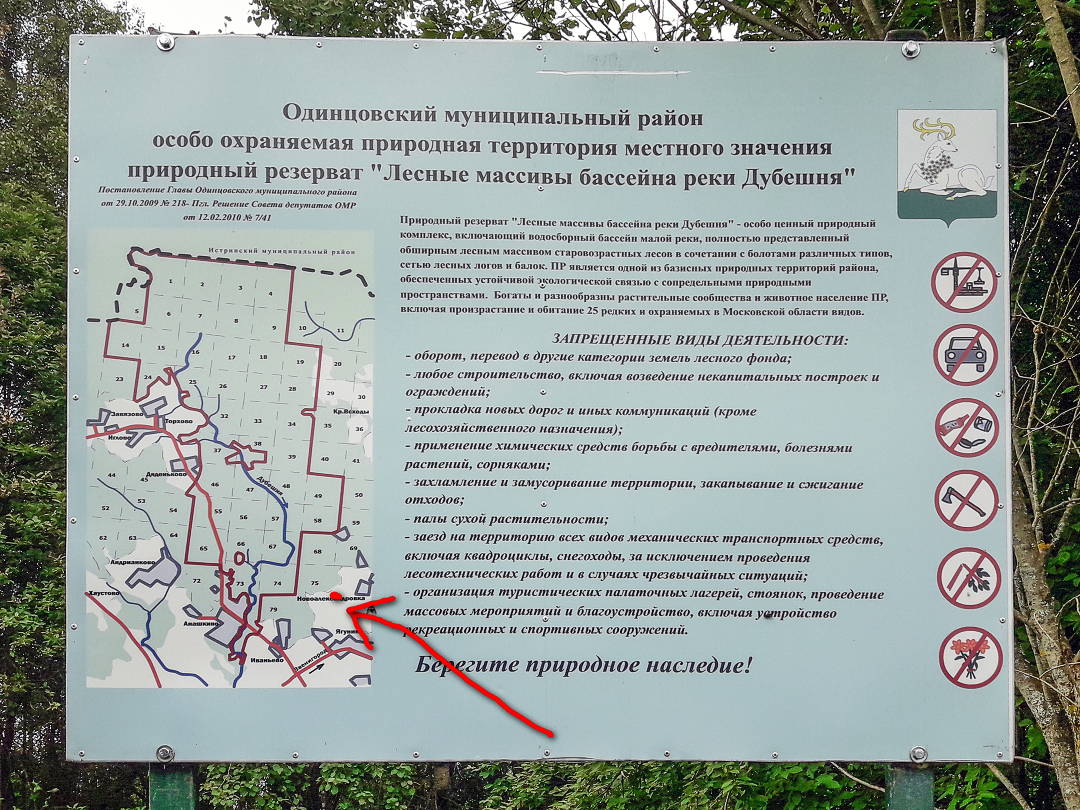
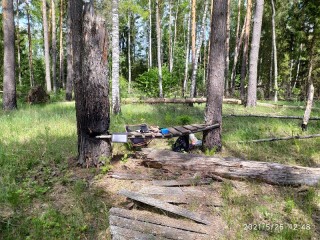
These photos show an information board installed a kilometer to East from the nearest boundary of the protected area through a dense forest and 2 km to South from the boundary if you move along the trail (the place where it is located is marked with a red dot on the photo)
Photos on the background of such “landmarks” do not confirm that the activator was really located within the boundaries of the protected area. Geotags could provide an association of photos to the location shown. But photocameras that able take photos with geotags are very rare and quite expensive, and besides that smartphones can do it in the same way, but they can also make GPS tracks. Additioally, there are ways to assign any geotag to any photo, no matter where and when this photo was taken. One way or another, suchlike proofs are costly for the activator and unconvincing for the log manager.
Other photos could be more convincing then photos with “landmarks” — are photos of the navigation devices screens showing geographic coordinates of a place, shooted, for example, on background of deployed radio equipment. These photos anyway require devices able determine the geographic coordinates of a place. They are all the same smartphones or touristic, or automotive GPS navigators that still should be photographed by something another. Obviously, all of these devices are able to make GPS tracks by itself. And this kind of photos itself still do not prove anything at all, except the navigation device was at a point with these coordinates at a certain time point.
All kinds of transport tickets, store and gas station checks, applications, permits, passes, etc. — do not make any sense in our game at all.
Thus, none of the “evidence” mentioned above is reliable and convincing, at the same time it requires some effort and time for both — as to create by activator, as to verify by a log manager. Insignificantly.
Besides, before providing any proofs to the log manager, the activator must be sure that he is actually located in the protected area, and not somewhere nearby. Especially if the boundary of the protected area is not indicated in any way on the terrain, which has the place to be all the time in our country.
Both of these tasks — obtaining of reliable and convincing proofs and HAM's own orientation regarding the boundaries of protected areas can be successfully solved by using of GPS navigation devices and GPS tracks. It is hard to imagine that a modern traveling radioamateur does not have in his arsenal and does not use some GPS navigation device, whether it be an automotive or tourist GPS navigator, or a smartphone with a map. Moreover, please note — these tasks can be solved with minimal effort on his part, in other words — turn on the track recording and go.
GPS tracks. What is it?
The Rules of the “Russian Flora and Fauna” award program, the national part of the international “World Wide Flora and Fauna” (WWFF), have state:
The required GPS track is not a photo or a display screenshot of your navigation device with a displayed route, not a route drawn on a paper map or Google electronic map, Yandex or the like, and not an electronic file created from suchlike a drawn route.
This is an ordinary text file created by your navigation device during your movement along a route, which contains the geographical coordinates of the points with an accuracy of several meters, the height of the points above sea level and the time when you were at these points. It may also contain other characteristics of points depending on the application creating the file, for example, temperature, heart rate, cadence, etc.
GPX (GPS Exchange Format) — widely used, public XML-format of files for storing and exchange GPS data between various applications.
KML (Keyhole Markup Language) — practically the same, but recorded on Keyhole markup language, targeted to Google applications. KMZ — the same KML, but in a compressed form (ZIP).
The distance between the points is usually quite small and is determined by the settings of the application used for track recording.
You can open the GPS track in the suitable application, Google-, Yandex- or some other suchlike map and see the recorded route, as in whole as in the smallest details.

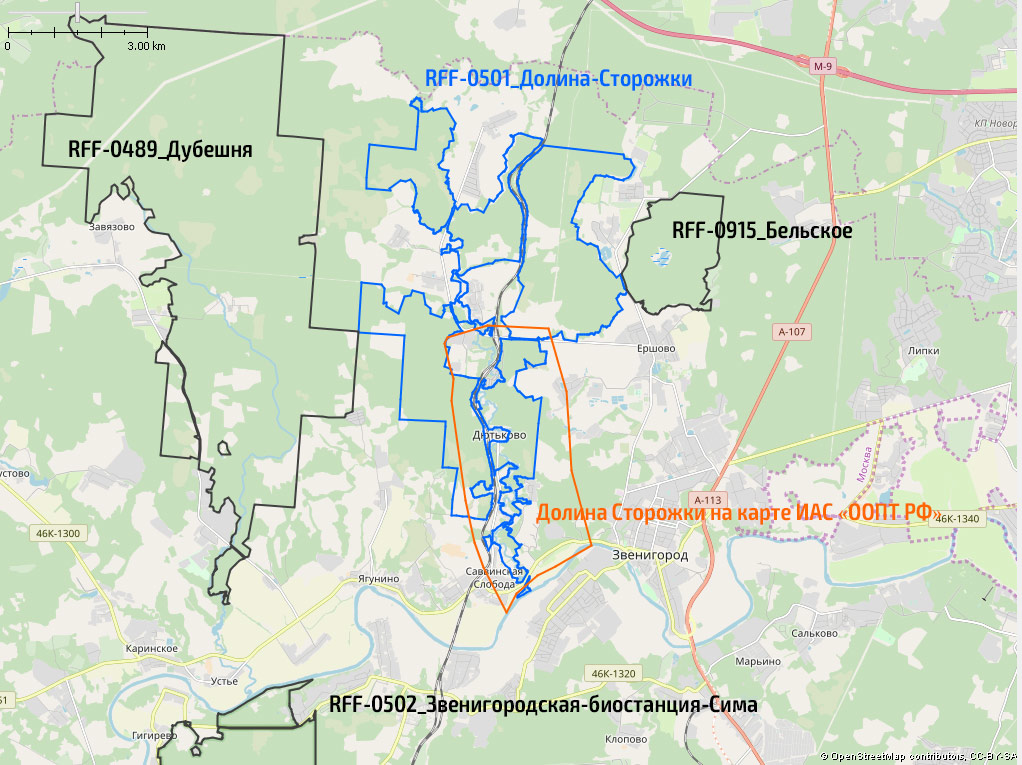
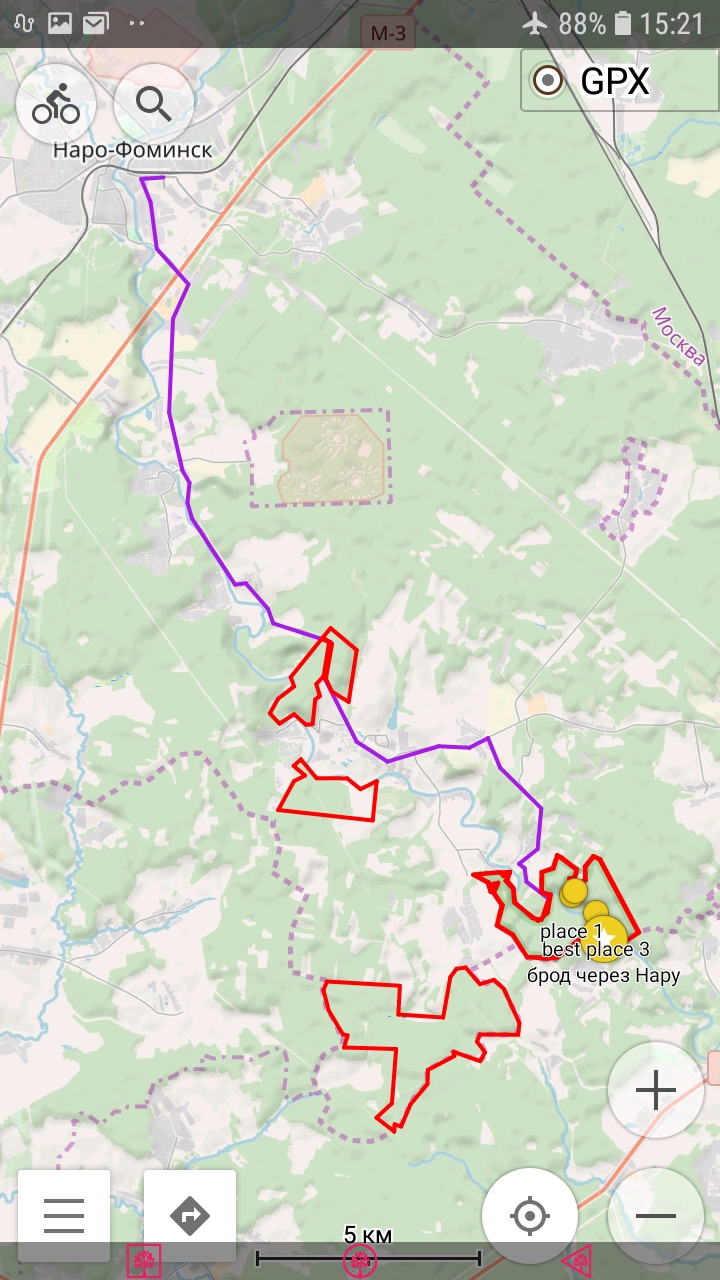
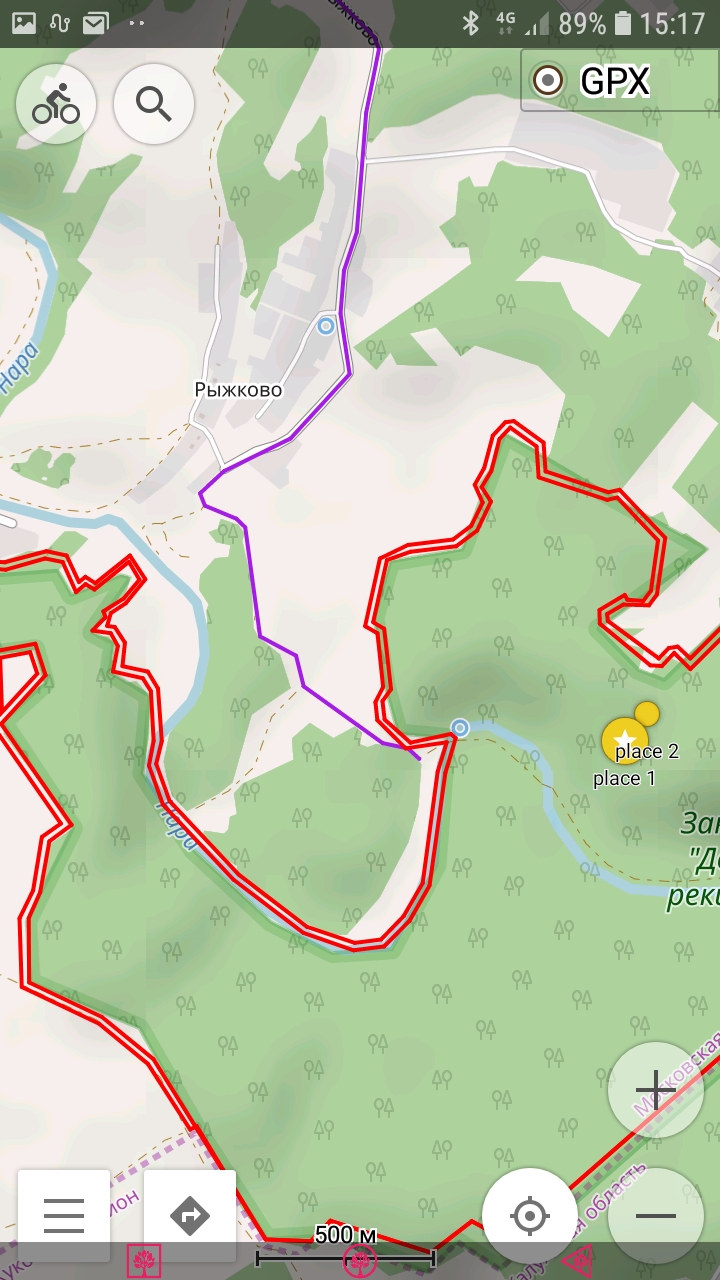
Boundaries of RFF-0915, Belskoye Lake are red. The GPS track of arrival at the place is blue, the track of departure is yellow.
You can see boundaries of some other references too:
— RFF-0501, the Valley of the Storozhka River to the west;
— RFF-0489, Forests of the Dubeshnya River Basin to the more further west;
— RFF-0502, Zvenigorod Biostation of Moscow State University and the Sima quarry, a fragments is visible to southwest.
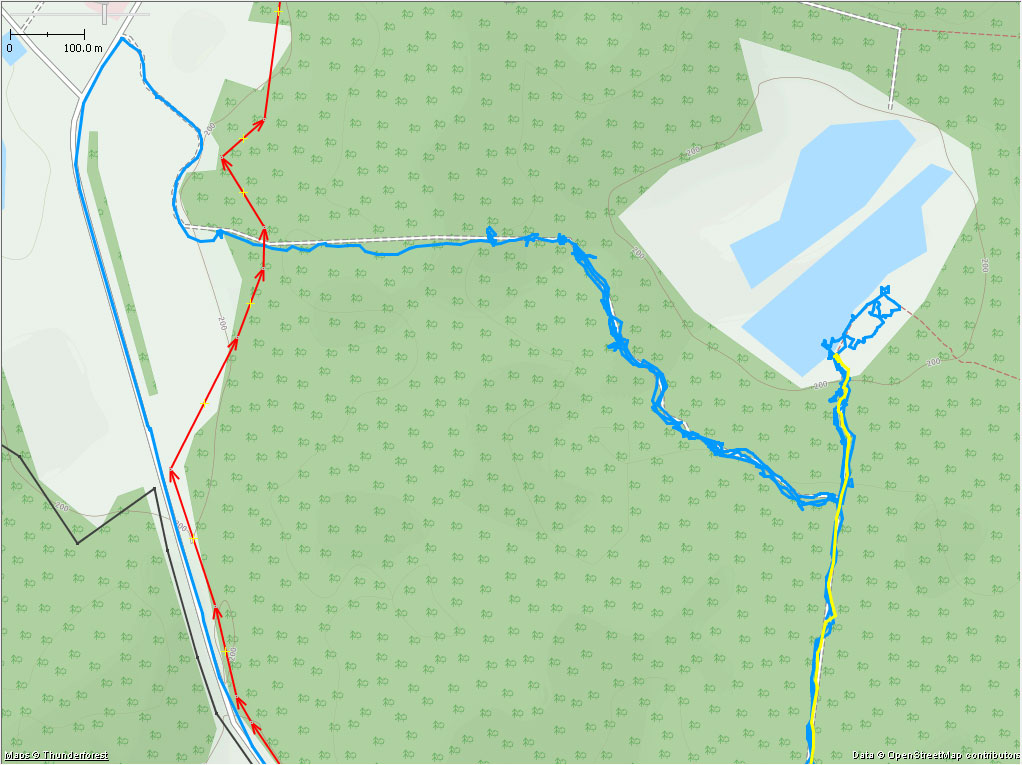
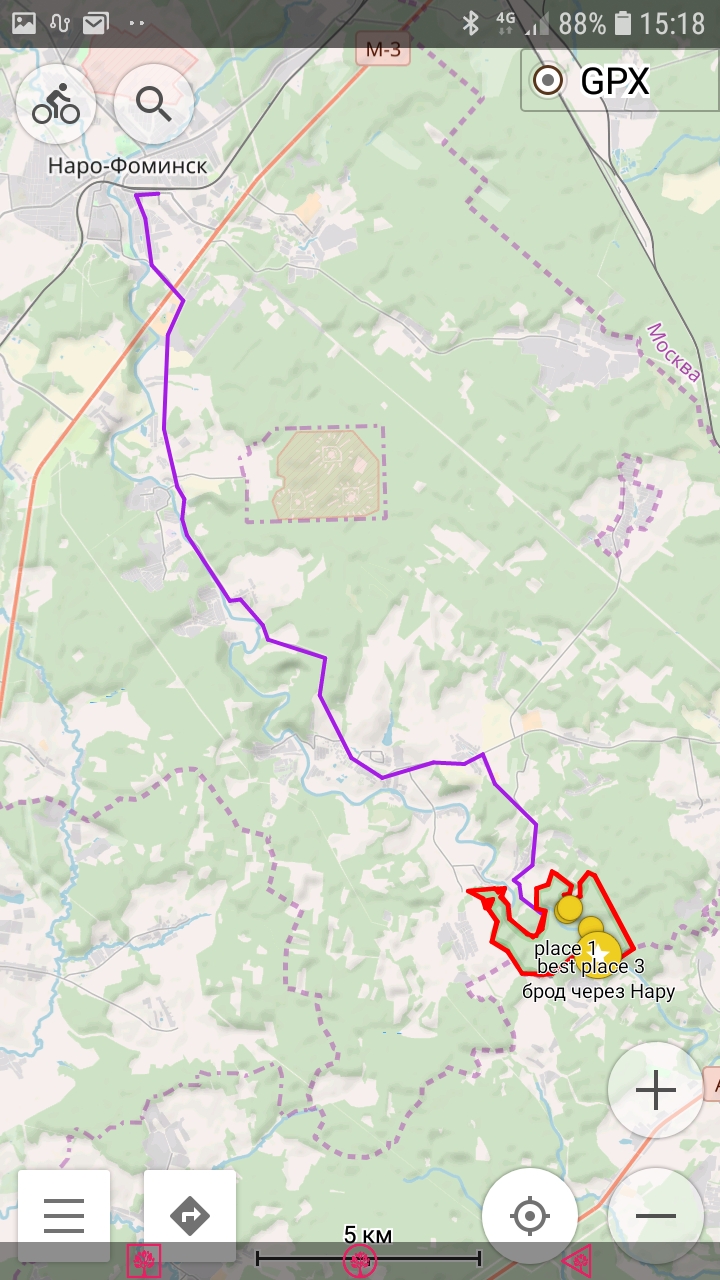
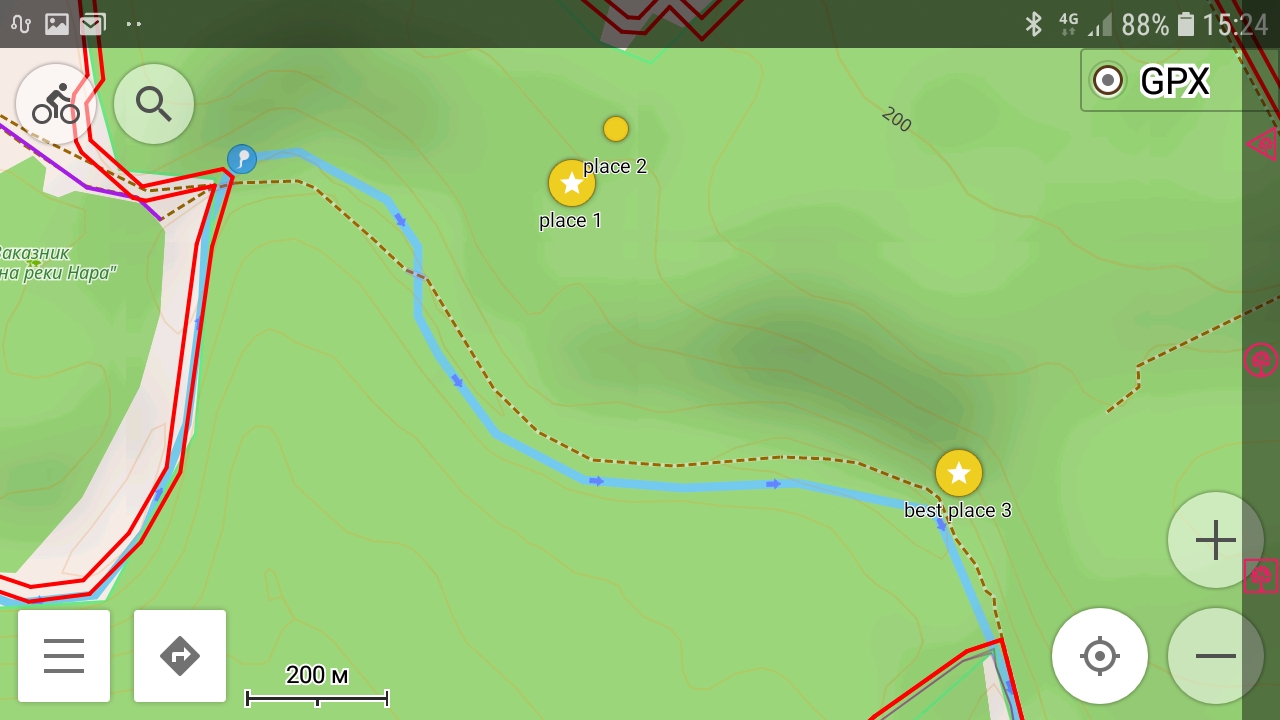
Movement on the territory of RFF-0915, Bielskoe Lake on a zoomed scale. Blue track — arrival, yellow track — departure. The complexity of the arrival track is due to prior on foot exploring of the way and the looking for a suitable place to deploy the antenna.
GPS tracks as proofs
What are exactly these “smallest details” in the tracks which are the interest for log manager?
You can absolutely be sure that we don’t have even the slightest interest in what floor and porch you left from, what girlfriends and how long you visited on the route, how much and which “warming up” in which store you bought, what gas station and how much was refueled into your bicycle, and another suchlike personal details that some activators are so worried about.
As the proofs, only the final fragment of your trip from crossing the border of the protected area to the place of your radio station deployment and the same fragment of your returning are interested. If you are so worried about an imaginary leak of secret data about your personal life, you can turn on GPS track recording just 1–0.5 km before the border of the protected area. And turn off the recording as soon as you crossed the border on the way back.
We are interested in (a) the fact of crossing the border of the protected area, (b) the radio station placement and the time of your arrival, (c) the time of departure from this place and (optionally) the fact of the crossing back the border. That's all.
The log manager checks these circumstances in GPS tracks, the authenticity of the GPS tracks themselves, and also checks whether the time on air (according to the log) fits into the interval between arrival and departure.
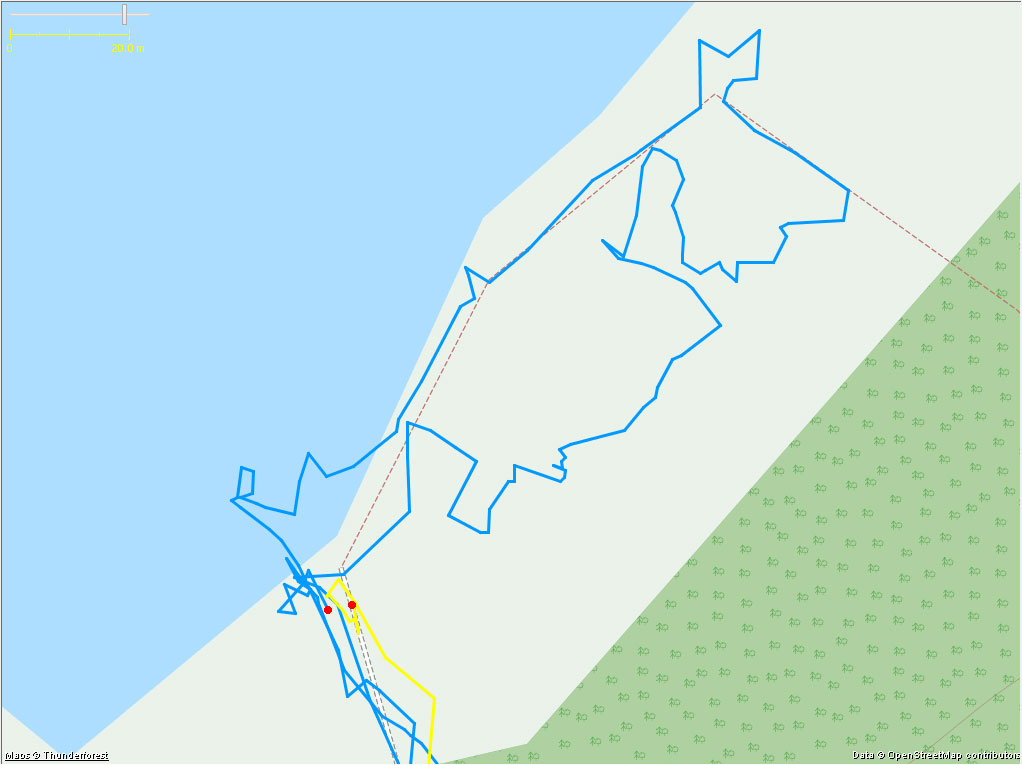

Placement. The end point of the arrival track and the start point of the departure track — red — differ by only ~ 5 meters. This may be due to both the accuracy of GPS positioning and the movement of the GPS device during shutdown (in fact, the bicycle with the navigator was moved to a more suitable place).


Arrival time is the end point of the first track on the first slide. Departure time is the first point on the second slide.
In addition, you can see the geographical coordinates and some other parameters of points and tracks in general
Arrival time - 10:27 MSK
Starting (First QSO) - 12:09 MSK
Shutdown (last QSO) - 16:45 MSK
Departure time - 18:47 MSK
________________________________
It is obvious that everything is OK here.
Reference boundaries
But, before checking these circumstances, it should to make sure that all these events took place within the boundaries of the protected area. Obviously, both the log manager accepting activation and the activator going to the protected area must have information about the boundaries of this protected area.
There are various publicly available sources of information about the boundaries of protected areas.
The most obvious source is public maps: OpenStreetMaps (OSM), Google, Yandex, etc. Their main limitations are that not all protected areas are marked on them, the veracity of the border marking there remains very doubtful. There is no need to demonstrate in this article, how “exact” the boundaries of protected areas are on these maps. You will see this yourself much more than once.
The most complete information about all protected areas of Russia, including map data, is available on the website (in Russian) of the Information and Analytical System “Specially Protected Nature Areas of the Russian Federation” (IAS “SPNA of RF”). Any case, we strongly recommend get to know it before you go anywhere to RFF. First of all, carefully study the zoning of the territory and the security regime, permits and prohibitions, if necessary, the contacts of the managing organization.
Description of the territory — relief, geological information, hydrology, flora and fauna description are interesting itself, and in addition, they can help to choose supposed place for the radio deployment. I am personally, preferring to deploy an antenna on a tall tree limb, most closely get acquainted with the description of vegetation in general and the characteristics of the forest in particular — tree species and their distribution in the territory, the nature and density of undergrowth, etc.
Unfortunately, IAS “SPNA of RF” has many drawbacks. A very leisurely server, the map backgrounds do not work well. It is not always possible to find the latest documents on a specific protected area — it is clear that it is impossible to keep track of absolutely everything in a database of almost twenty thousand objects and a huge number of notes, documents and books. Map data are also far from always accurate. Nevertheless, IAS “SPNA of RF” remains the most authoritative source of various information about russian protected areas.

Two illustrations of accordance the actual boundaries to boundaries indicated on the IAS “SPNA of RF” map
And finally, the third source exists. You probably noticed the illustration in the “GPS tracks. What is it?” section — black boundary contours of the RFF–0915, RFF–0501, RFF–0489 and RFF–502 territories. And definitely, you could not don't pay attention to them on two slides just before this paragraph. These are the closed GPS tracks (plots) displayed on the map, we prepared them in the GPX files form. We make such plots based on geographical coordinates from SPNA passports, verbal descriptions of borders, forestry charts, cadastral plots of Russian land registry, etc. Using these plots and GPS tracks, the log manager verifies the fact the activator crossed the boundary of RFF reference. Unlike of other sources, our plots also display the boundaries of the SPNA buffer zones, where activation is valid the same way as within the boundaries of the main territories, unless otherwise indicated.
They are all most accurately aligned to the terrain, are detailed as possible, and, most importantly, if you will activate RFF reference within the boundaries we designated, it will be accepted if other rules will carried out too. It can not be said surely if you will use other information sources about boundaries.
Another important advantage of our GPX is the ability to use them on a trip even when you do not have access to the Internet, which is required for any other electronic sources of boundary information, or offline electronic maps downloaded into your smartphone. I will tell about this more detailed below.
Unfortunately, such GPX files are available yet for not all RFF references in the Directory. Their preparation requires a lot of time, we do this work as far as possible and as necessary. Currently, all of Moscow (R3A) and the Moscow oblast (R3D), Karelia (R1N), and a some RFF references from Bryansk (R3Y) and Kaluga (R3X) oblasts, Permskiy Krai (R9F), and some other entities are ready. Now we can send you the boundaries of the RFF references you are interested in from those we have already prepared, by e-mail request. Later they will be available for downloading from the site by yourself.
If required RFF reference is still not in the GPX file form, we will prepare it if you request beforehand, but not on the last day before your trip — we need some time to prepare it.
We have a plan to indicate the boundaries of all RFF references on the RDA-RAFA-WCA online map, supported and developed by Andrey R1CF, but we still can not do it well without special skills to deal with cartographical applications. Perhaps, later we will pay more attention to this plan.
Please note: the SPNA boundaries indicated by our GPX are not official ones and can only be used in frame of the WWFF award program.
GPS tracks. How to record them?
GPS tracks can be recorded, as mentioned above, using automotive- and touristic GPS navigators, as well as using special applications installed in smartphones with GPS receivers (almost all smartphones currently sold are equipped with such receivers).
We will not consider all kinds of online GPS trackers with the location data transmission via satellites, and with service subscriptions, based on time, because of their sky-high prices and low prevalence in general.
Owners of touristic and automotive Garmin’s should not have any problems in principle. Garmin devices have track recording as one of the main functions, and the owners are most likely familiar with it better than us.
Navitel automotive navigators can record and save GPS tracks too, owners who usually do not use this function, should read the manual for their devices. The same can be said of other brands of GPS automotive navigation devices.
For those who have never previously recorded GPS-tracks, we will consider the most affordable way to record them using smartphones and tablets with the Android operating system, which, most likely, travelling radio amateurs have.
I scarcely can make mistake with the assertion that all modern, even relatively inexpensive smartphones are equipped with a GPS receiver. Things can be more complicated with tablets — I've seen such gadgets without a GPS receiver. You won’t succeed with them. Of course, there are external GPS receivers that communicate with a tablet or laptop via Bluetooth or USB, but their price is so specific that it may be simplier to buy an inexpensive smartphone.
There are many Android applications that use a GPS receiver to solve their various tasks — from specialized sportive, such as Strava, Runtastic, etc., specialized urban, for example, Yandex transport, above mentioned automotive navigators for Android, suchlike Yandex navigator, Navitel, etc. to general applications like as Google Maps, Yandex Maps, MapsMe, Maverick, etc.
I tried many of them and eventually settled on “OsmAnd”, which successfully solves all our tasks and does not contain too much excess options. I recommend this application to you, and it will be a bit explained below. Perhaps OsmAnd will not suit you and you will find, in the end, something more convenient, everything is in your hands and smartphones/tablets. What you should pay attention to:
- GPS-tracks recording and the ability to “share” them;
- loading GPS tracks and routes into the application (not everyone cares, but note: surprisingly, many applications do not know how to work with external memory cards, do not know how to set a special place for storing recorded and loaded from outside tracks);
- the ability to display a few tracks at the same time and, it is highly desirable, to set for each of them own display parameters (line color, thickness, transparency), the ability to enable or disable the displaying of some tracks;
- the ability to work without access to the Internet, i.e. pre-load into the smartphone the so-called offline maps of regions.
The screenshots of the application shown below were prepared for the Russian version of this note but, sure, that the appearance of the application is no different for other languages too.
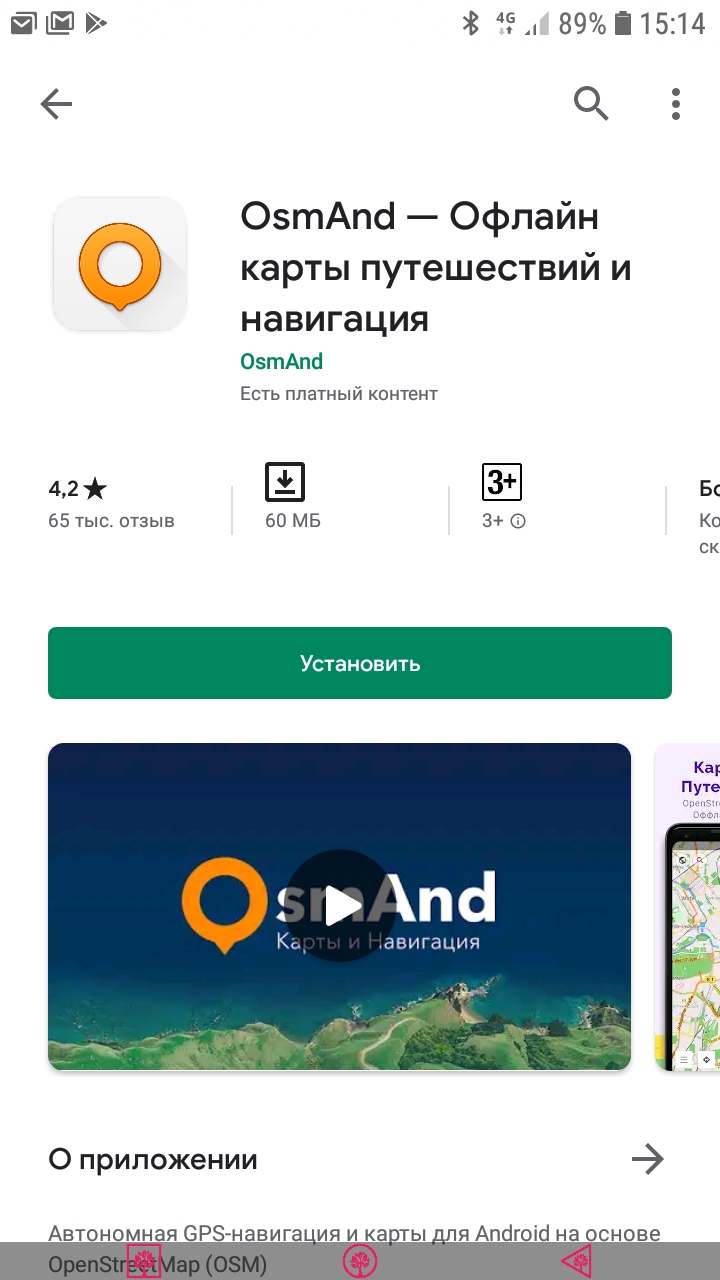
“OsmAnd” can do all this. It is easy to find the application on the Google Play Market. There are both free “OsmAnd” and paid “OsmAnd+” versions. The free version has limited (up to 7) number of map downloads and there is no way to view POI descriptions from Wikipedia. Neither the first nor the second is important for our tasks. The free version will be enough. Installation is simple and does not cause any difficulties. Just tap the “Install” button.
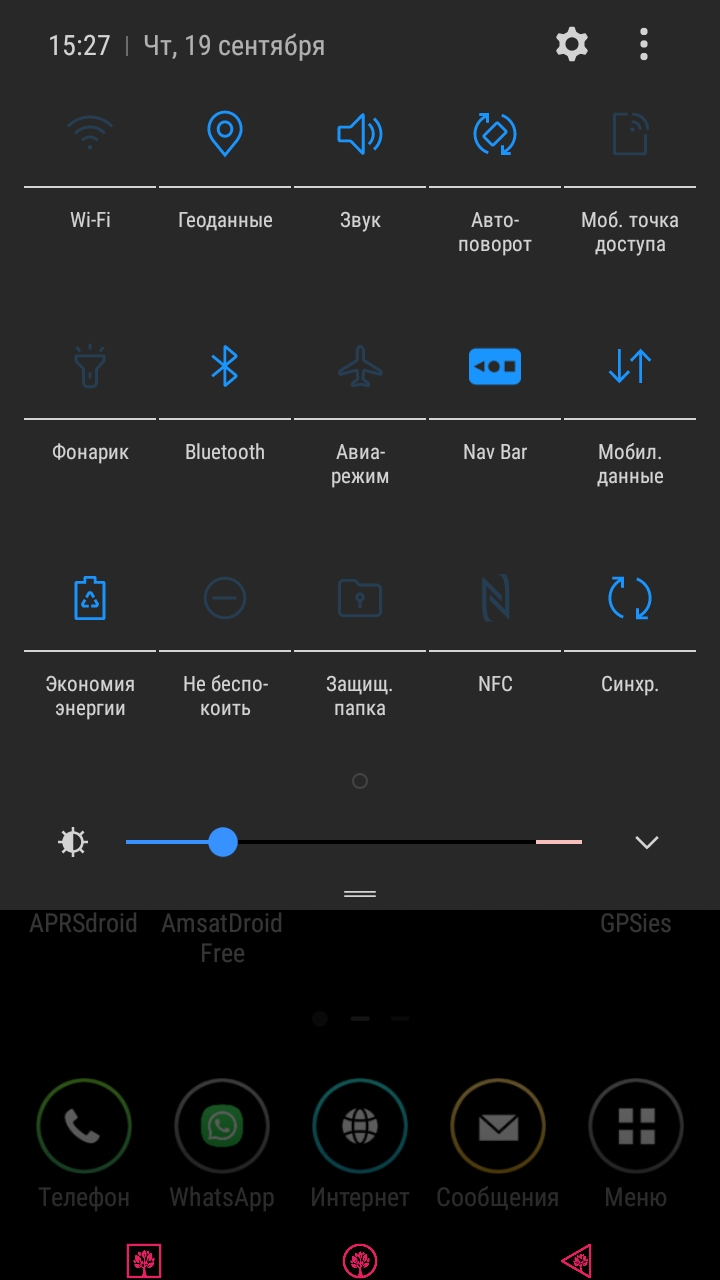
In order to the application would be able to determine your location, you must enable the GPS module in your smartphone. This is the second icon in the upper left row on my screenshot. It is switched ON here. The module additionally uses power, so it makes sense to turn it off for powersaving when not in use.
To prevent the track record interruption at the moments when the smartphone’s display goes blank, you should turn off the power saving mode (the first “Energy Saving” icon in the third bottom row — it is shown in the “ON” state). There are other ways to deal with track recording interruptions during the blanking of the display, I did not discover them due to the lack of need. You will explore it yourself, if you want.
The appearance of these icons may vary depending on the Android version.
This is the application’s main screen. You will find out yourself the purpose of the buttons, their location and set of displayed. I will especially note only the two most important buttons:
- all application settings, maps loading, tracks, etc. are in the application menu, which you can open by tapping the button in the lower left screen corner;
- tracks recording is activated by tap on round button with a “GPX” label in the upper right corner of the screen. Here it is shown in gray — track recording is switched off. This button is red during recording a track..
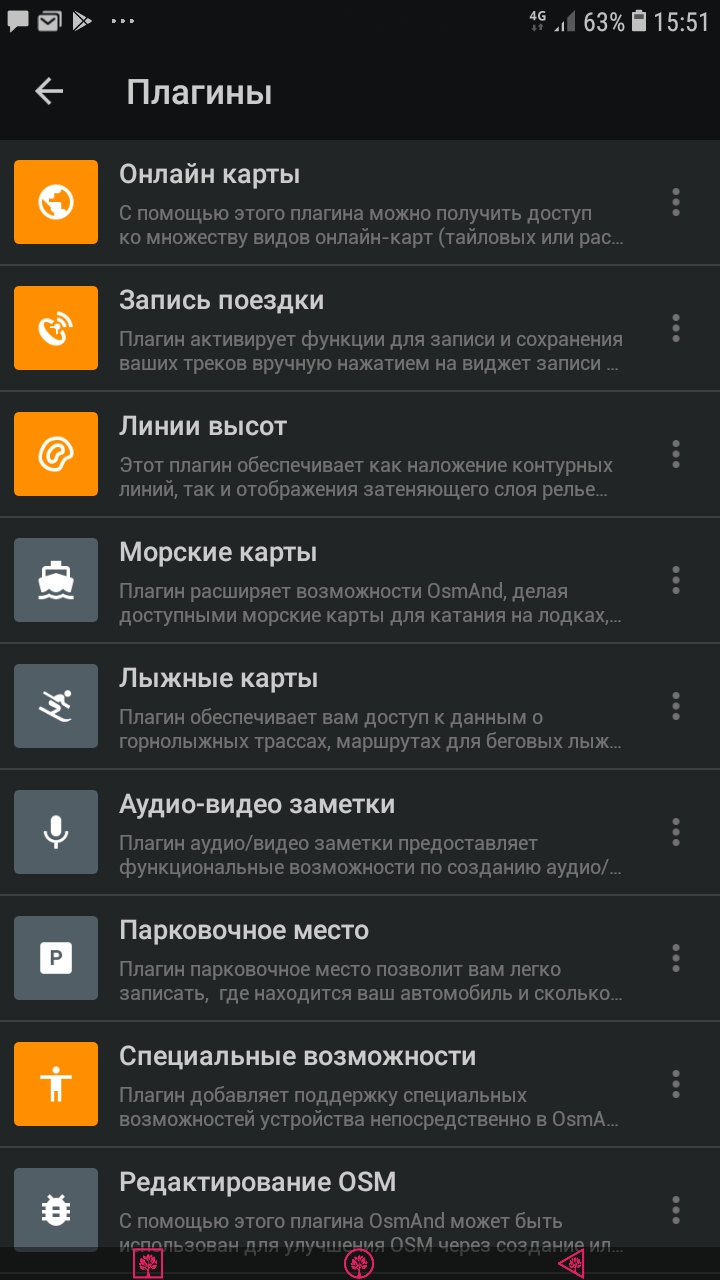
In order to appear this button on your screen, you need to enable the “Trip recording” plugin:
Menu > Plugins > Trip Record
The plugin has its own settings. It is not difficult to understand these settings by yourself.

Stop track recording after arriving to the place — call up the pop-up menu by tapping the “GPX” button and select the “Stop GPX Logging” command. Do not forget to save the recorded track — call up the pop-up menu by tapping the “GPX” button again and select the “Save current track” command. Then, in order to save the smartphone's battery charge, you can exit the “OsmAnd” application and turn off the GPS module (“Geodata” icon) until the leaving the activation place.
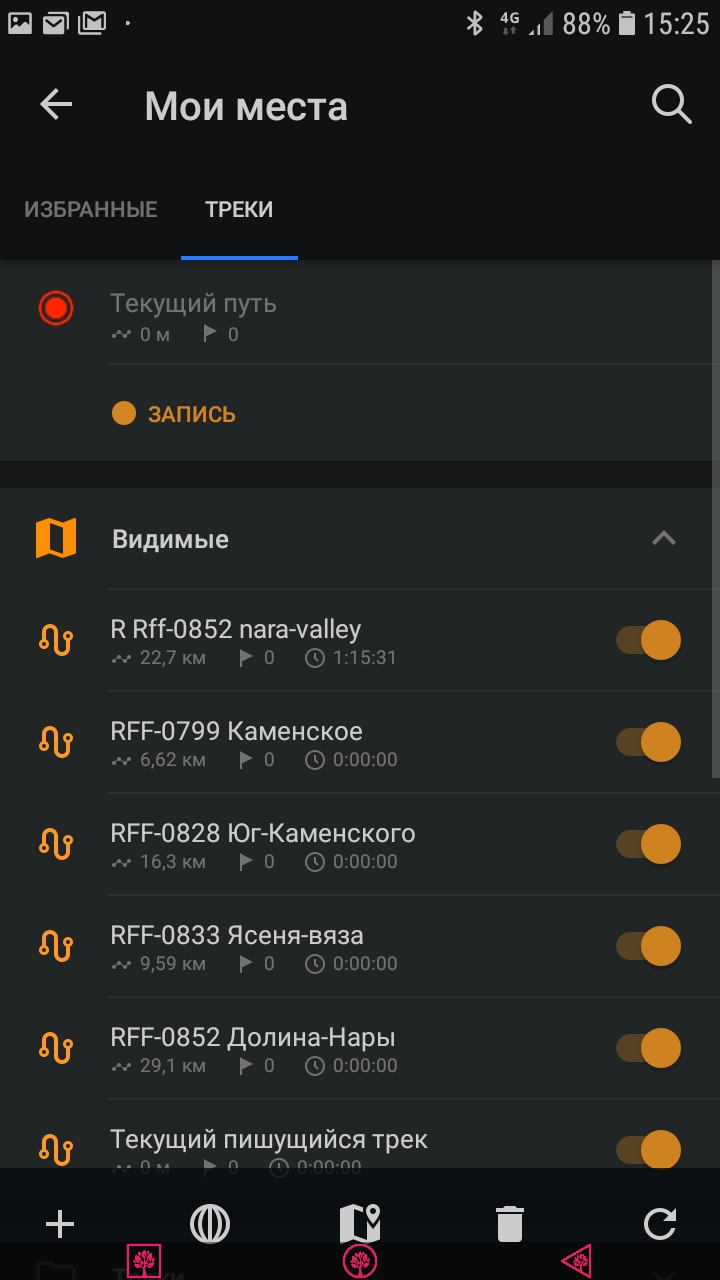
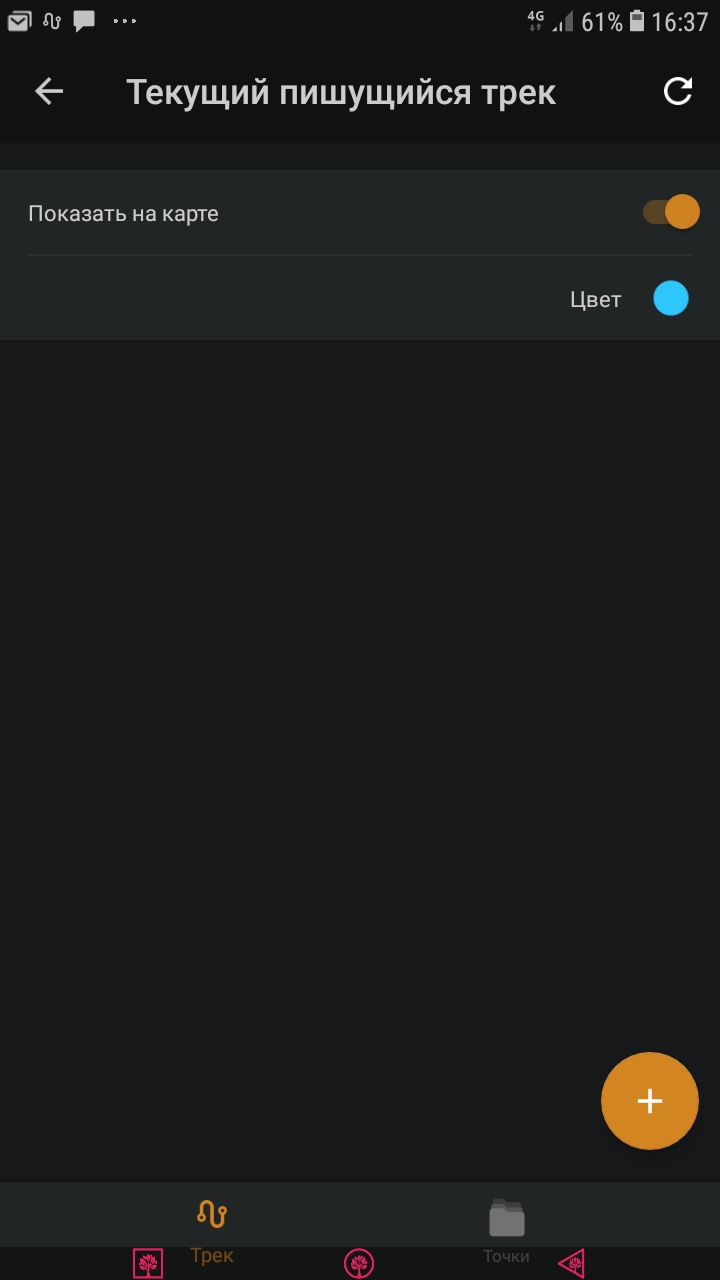
Management of all GPS tracks is located in the Tracks tab: menu > my places. Here you can enable or disable the track displaying on the map, set their individual color and line thickness, start and stop recording the current track, and so on. Carefully review this screen on your smartphone, scroll down to access folders, containing the tracks recorded by the smartphone, folders, containing tracks downloaded from the outside, etc.
The application works great both with vertical and horizontal screen layouts, with various map over- and underlays, or without laying in general, with different display zooming — the larger the zoom, the smoother and more detailed are outlines of objects on the map, and more smooth and detailed your tracks are displayed.


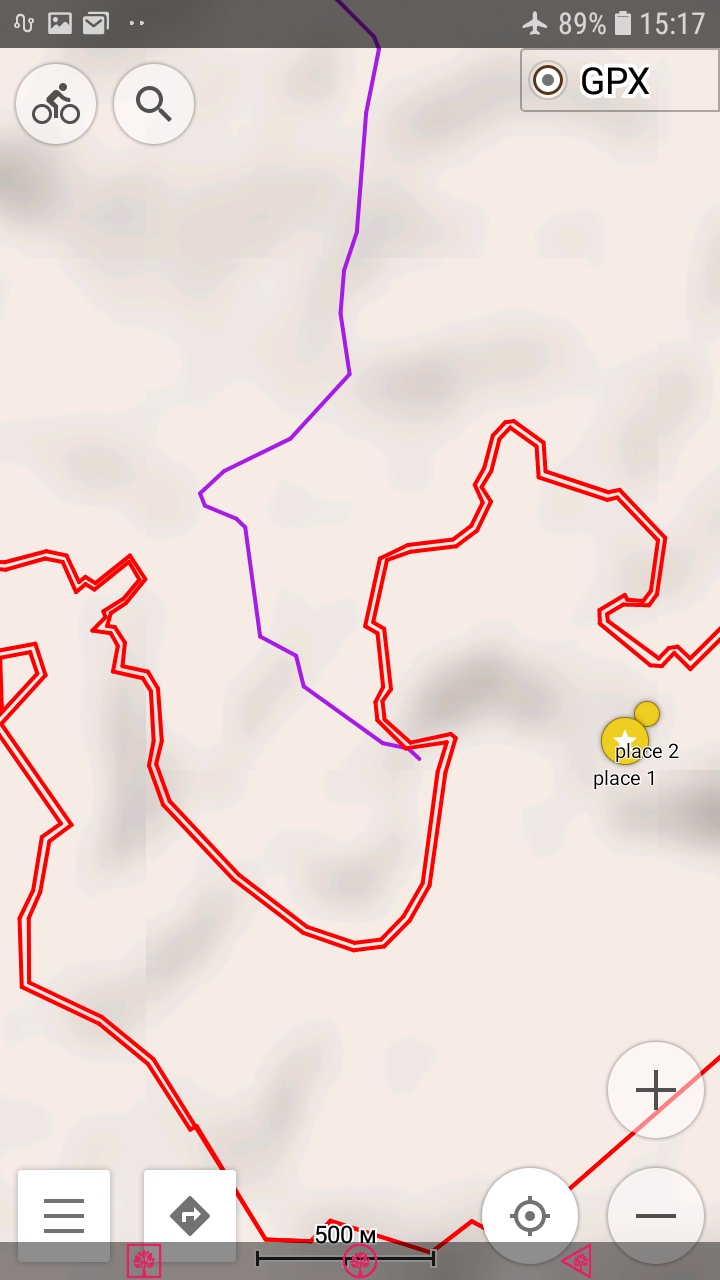
Besides, the last illustration demonstrates the advantages of navigating using our GPX-files of territory boundaries, if you have no offline maps and there is no Internet access to download them:
— the boundaries of the protected area are displayed on the screen with the color you set, your location relatively to these boundaries and the whole currently recording track of your movement. This case you will have to independently define on the ground the route to get to the area boundaries. But, any case, you will not miss these boundaries.
Please note, the displaying of the recording GPS track of your movement in the application is disabled by default. If you want to see the recorded track on the screen, forcibly enable its displaying.

The last step that completes the RFF-reference activation is sending the QSO log and GPS tracks of arrival and departure from the place of activation to the log manager. Surprisingly, but some users find the getting of recorded tracks difficult, despite the fact these are ordinary basic file operations. It just needs to know where the application file storage is located. This can be individually for various smartphones, different Android versions and your application settings. Look for the file storage path in the general application settings in the menu > settings > OsmAnd settings > Data storage folder. In addition, the plugin “Trip recording” in settings > [select profile, eg Driving, Cycling, etc.] > The track storage folder is set for storing of the recorded tracks into separate by month folders. There you should look for your recorded GPS tracks using the file manager if, for example, you connect your smartphone to a personal computer.
Another way is to access the track files directly in the OsmAnd application. If you have carefully read this note, you remember about access to the track files in the “Tracks” tab, (menu > My places). By opening the corresponding folder, you will get a list of all files. Call the context menu with the commands available for this file by tapping on the icon of three vertical dots to the right of the file name and choose required action there.
Here you can move the file to another place, more convenient for you, or “share” it, for example, send it by e-mail to yourself, and then check your e-mail box on your personal computer. This is the most convenient way for me.
Here, in fact, are all the difficulties with obtaining evidence. Do not forget to turn on the track recording when approaching the RFF reference, and do not forget to turn on the track recording when leaving the activation point. Nothing more is needed, regardless of the weather, lighting, free time, etc. Attach the recorded tracks to your QSO log and send an e-mail to the log manager with 100% proof of several (tens) kilobytes size instead of many megabytes of photos which do not prove anything.
You can blame us of mistrust to activators as much as you want, but trust and proofs are much more convincing than just trust. In addition, everyone knows the joke that gentlemen believe each other's word.
Finally, if whoever wants to participate he find a way. If whoever wants to hide something, he find excuses and reasons.